Abstract: If you wish to setup a fully supported Skype for business (=SfB) environment you could use a hardware loadbalancer (for example Kemp or F5) or use the Microsoft Web Application Proxy [=WAP] (which is part from Windows Server 2012 R2).
This short howto will explain the steps which must be taken in order to replace a former hardware loadbalancer (used for the Lync Webservices) with the Microsoft Web Application Proxy (which is now supported) for the SfB Webservices.
Note: We will use the Web Application Proxy for SfB, however you might use it later one also for MS Exchange or Office Web Apps / Office Online Server. But this config isn´t covered in this howto.
Preparation:
– Setup a ADFS as mentioned (Install ADFS Server on Windows 2012 R2). Note: For SfB we do not need any authentication configurations.
– Setup a server in the DMZ (our Web Application Proxy server) based on Windows 2012 R2. On that Server:
* block the .net 4.6.1 Framework installation as mentioned here for Exchange until MS fully support that with SfB
* Assign one external IP Address (we use the internal DNS server in that howto) [If you wish to replace a old hardware loadbalancer you can assign the IP here]
* A public trusted certificate (e.g. from Comodo, Verisign, …) [If you wish to replace a old hardware loadbalancer you can export it from there and reuse it here]
* The server does need to be domain joined, but if you want to publish non-claims aware applications using KCD (Kerberos Constrained Delegation) it need to be domain joined
– For the LAB configuration here, you need to be a domain administrator
– Configure the proxy (as mentioned here) on the server correctly, so that the server is able to reach the internal server
Firewall:
– allow https traffic to and from the Web Application Proxy server
– the Web Application Proxy should have access to the internal DNS server
– the Web Application Proxy server must reach the SfB Frontend Server / the Hardware LoadbLanancer via 4443
Implementation steps:
1.) If you didn´t use Split DNS, then you might need to adjust the host file on the WAP server and point the ADFS DNS name to the internal server
2.) On the Microsoft Web Application Proxy [=WAP] Server import the public SSL certificate at first via MMC (into the Personal certificate store)
3.) start a powershell (run as admin) and enter:
Install-WindowsFeature Web-Application-Proxy,RSAT-RemoteAccess-Mgmt, RSAT-RemoteAccess-PowerShell, GPMC, CMAK
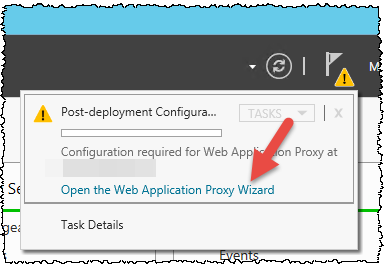
4.) After the installation finished, open the Web Application Proxy Configuration Wizard in the Server Manager

5.) Click on next

6.) Enter the federation service name you defined when you setup the ADFS Server. Enter also a username and password. Then press next.

7.) Select now the certificate which should be used. Then press next.

8.) In the confirmation make sure the info´s are correct, then click on configure

9.) If you see the screen below the web application proxy was configured successfully.

10.) Your Microsoft Web Application Proxy [=WAP] is now ready to be used. So we can now start to publish our web applications.
11.) Now open the Remote Access Management Console and click Publish

12.) Press next in the following screen

13.) As PreAuthentication we need to use “Pass-Trough”

14.) Inside the Publishing settings, enter a useful name (A), choose the external URL which you entered in the topology (B), choose the certificate you imported (C), and define the backed URL (D) this is normally your internal Frontend pool which is listening here on 4443. So make sure you use the correct hostname and port.
You can also check on the WAP server via telnet if the port from there to the internal server is open.

15.) If you are fine with the summary seen there, press on “publish”

16.) Once successfully published click on “close”

17.) Now you need to disable the DisableTranslateUrlInRequestHeaders to avoid issues mentioned here.
17a.) At first we need the Application ID, so run the following comand and make a note from the ID.
Get-WebApplicationProxyApplication | Format-Table ID, Name, ExternalURL
17b.) Once done and once you have the ID check the configuration via:
get-WebApplicationProxyApplication –ID <application_ID> | fl
this should show something like (DisableTranslateUrlInRequestHeaders is currently on false):
ADFSRelyingPartyID                           :
ADFSRelyingPartyName                         :
BackendServerAuthenticationMode              : NoAuthentication
BackendServerAuthenticationSPN               :
BackendServerCertificateValidation           : None
BackendServerUrl                             : https://yncpool.int.contoso.com:4443/
ClientCertificateAuthenticationBindingMode   : None
ClientCertificatePreauthenticationThumbprint :
DisableHttpOnlyCookieProtection              : False
DisableTranslateUrlInRequestHeaders          : False
DisableTranslateUrlInResponseHeaders         : False
ExternalCertificateThumbprint                : F2A2340D3783803F827155F14147042343B105A23A
ExternalPreauthentication                    : PassThrough
ExternalUrl                                  : https://lyncweb.contoso.com/
ID                                           : 4f8906D6-XXXX-XXXX-XXXX-8A753845d5672
InactiveTransactionsTimeoutSec               : 300
Name                                         : Skype for Business - Web Services
UseOAuthAuthentication                       : False
PSComputerName                               :
17c.) To fix that we need now to set the DisableTranslateUrlInRequestHeaders to true via:
Set-WebApplicationProxyApplication -id <application_ID> -DisableTranslateUrlInRequestHeaders:$true
18.) If you wish to use the web application proxy for other services, then you need to repeat the steps. You can refer to the Official Microsoft howto here. Or check the “Configuring Office Online Server with Skype for Business” article here.
For the troubleshooting you could start with the eventlog.
Useful links:
https://blog.kloud.com.au/2013/07/15/publish-lync-2013-with-2012-r2-preview-web-application-proxy/
http://exchangepro.dk/2013/11/15/use-web-application-proxy-to-publish-lync-server-2013/
https://technet.microsoft.com/en-us/office/dn947483


